


Multi-functional Marking System
คุณสมบัติสินค้า:
SKU : ZY-D200
หมวดหมู่ : Gel Documentation , 12. Lab Equipment , Laboratory Instrument , Servicebio ,
แบรนด์ : Servicebio
Share
Rapid Batch Laser Marking, Permanent Information Retention
Product Information
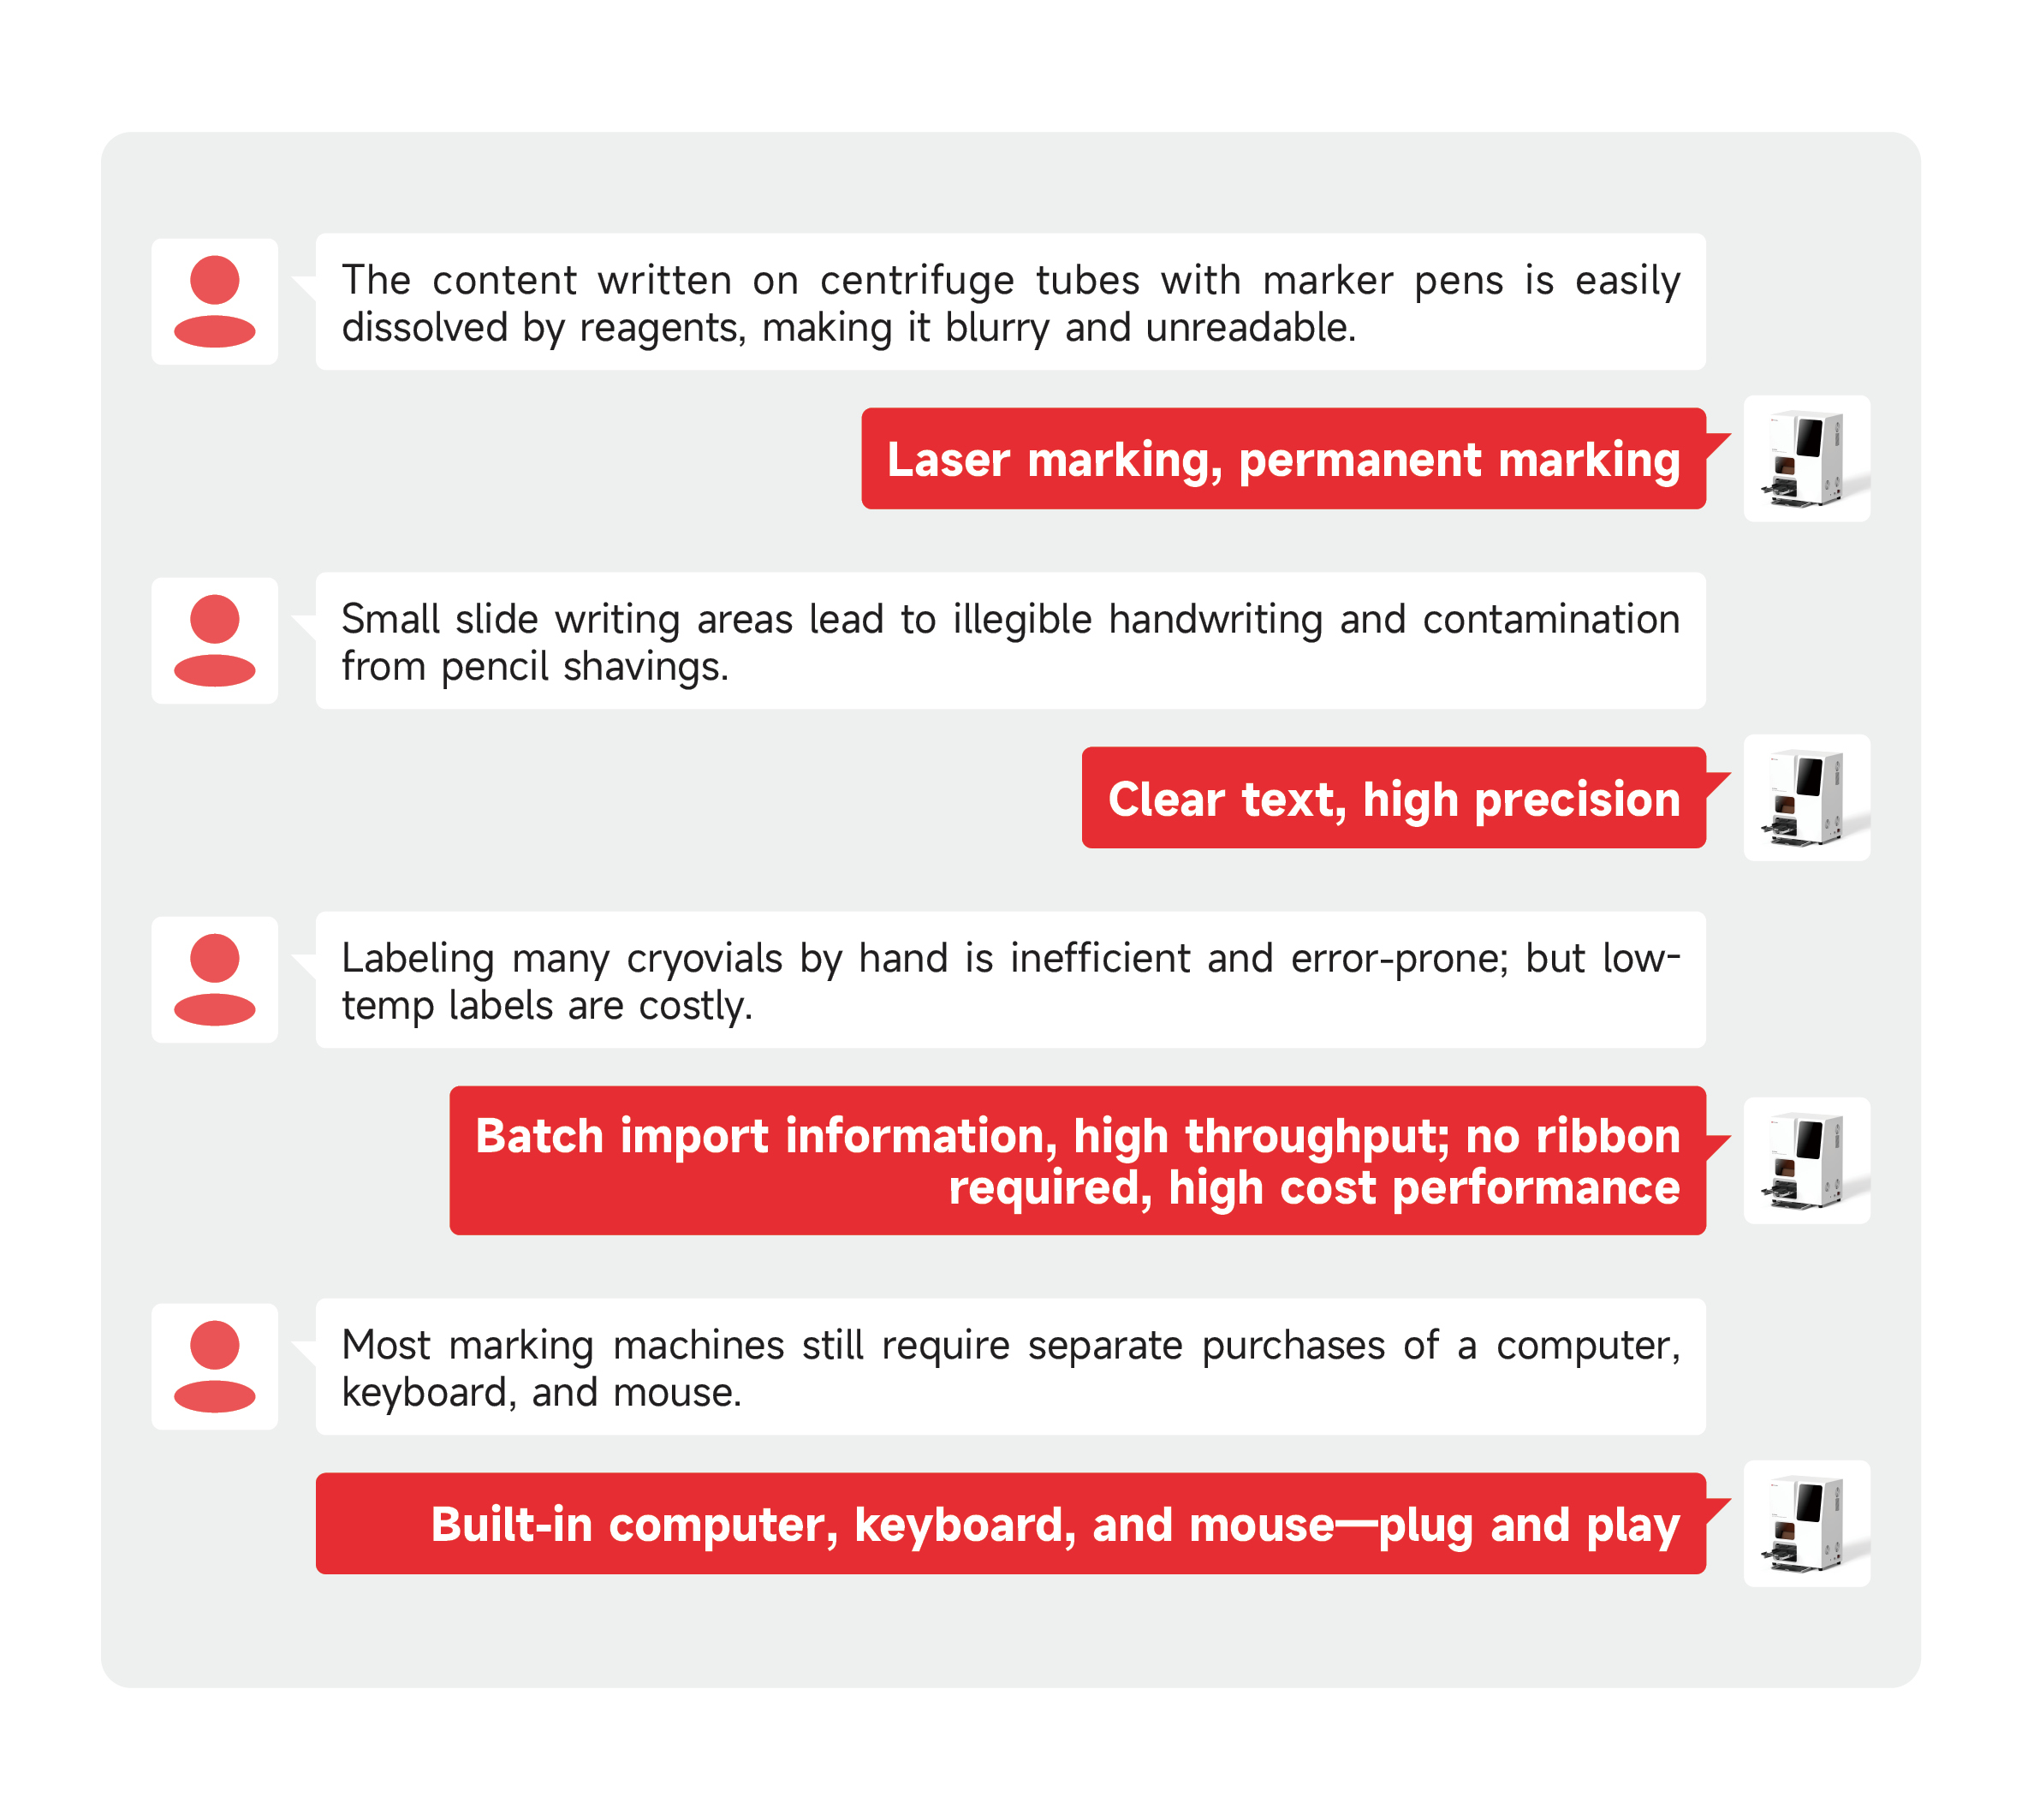
Compared to silkscreen printing, laser marking can greatly enhance the efficiency of coding. This product allows for manual input of characters or bulk import of EXCEL information, effectively avoiding human input errors and achieving high-efficiency coding. With CCD visual positioning, it reduces manual intervention and improves coding quality.
Product Features
1. Laser marking, without the need for ribbons, inks, or toners.
2. Supports bulk import of information and customized content.
3. Visual automatic recognition of items to be printed.
4. Comes with a built in computer, keyboard, mouse, and is ready to use upon plugging in.
5. 3W ultraviolet laser with air-cooled and low-noise design.
6. Supports customized development.
No. | Product Model | ZY-D200 |
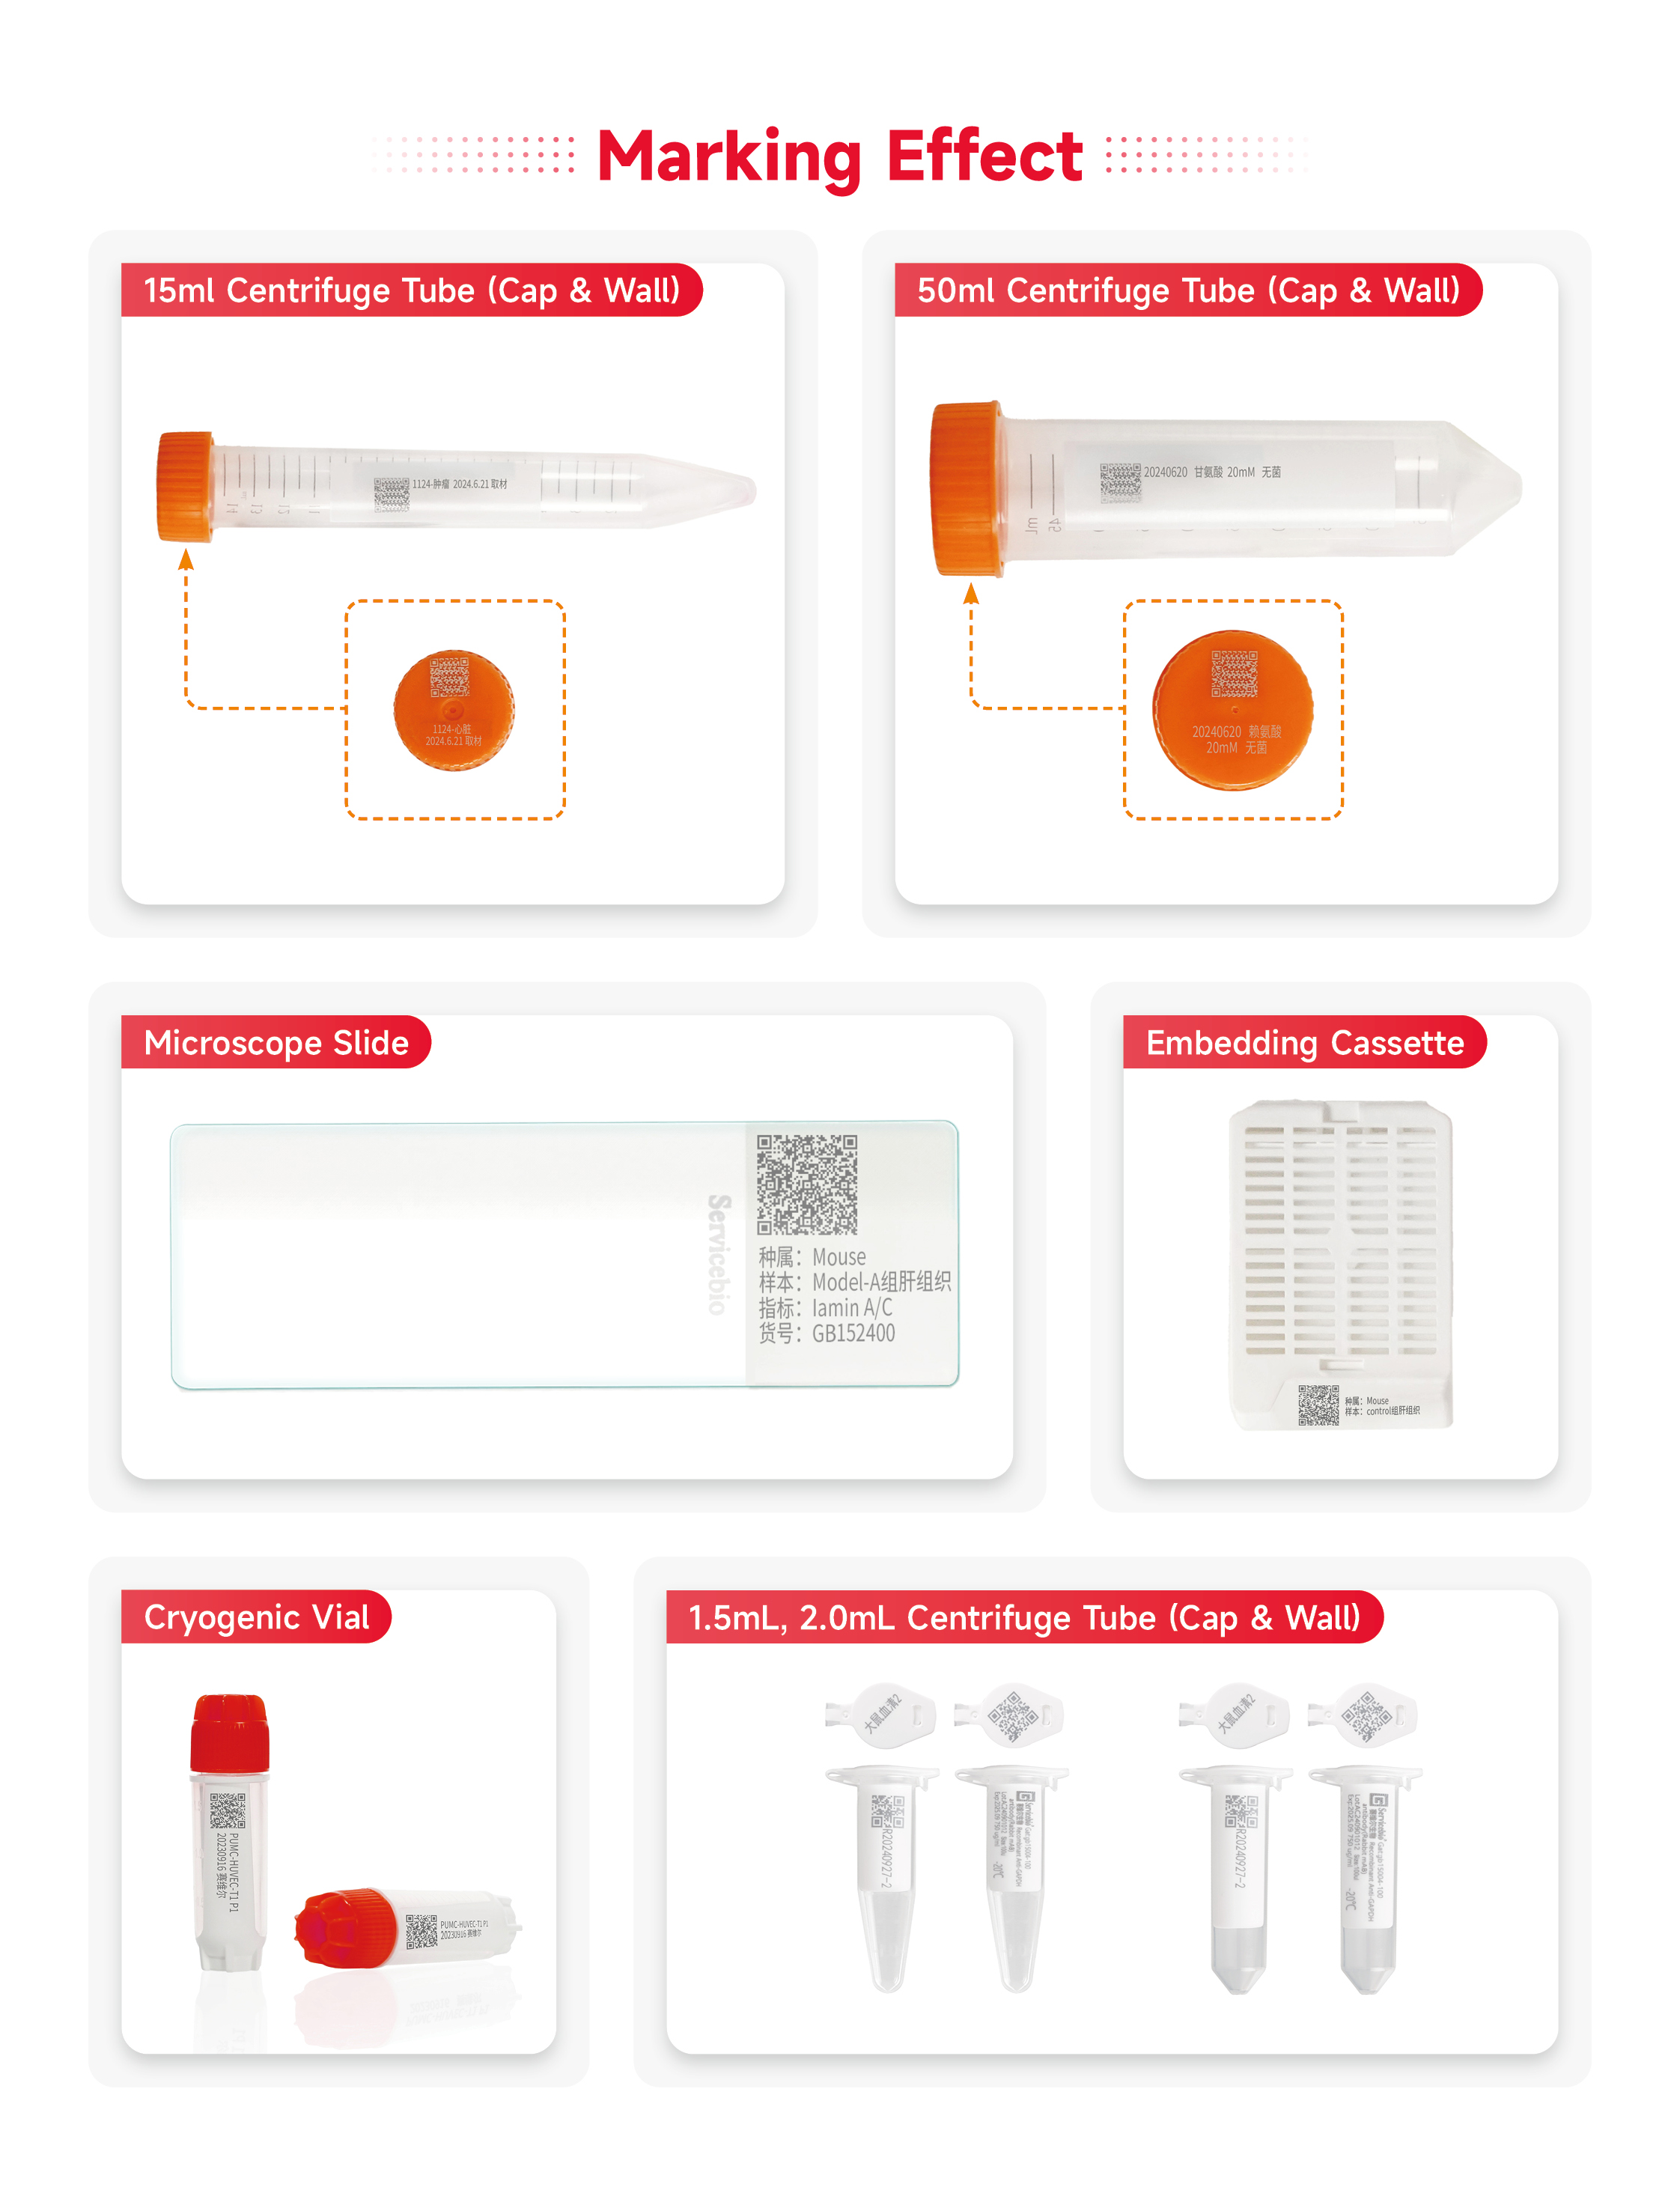
1 | Module Specifications | 50ml centrifuge tube (including the cap and the body), 15ml centrifuge tube (including the cap and the body), embedding mold, slide, cryogenic vial) |
2 | Laser Wavelength | 355nm Ultraviolet Laser |
3 | Laser Power and Heat Dissipation | 3W air-cooled ultraviolet solid-state laser, air-cooled |
4 | Laser Average Power | >3W@40kHz |
4 | Overall Dimensions L×W×H Max | 480mm×350mm×705mm |
5 | Weight Max | 30kg |
Performance Parameters
Function Parameters:
Operating Function | Importing information through the laser and marking the imported informations QR code onto the product. |
Marking Working Temperature | Temperature: 15~35°C, humidity 90% |
Other Features:
Display Screen | 10.1 1280 × 800@ 60 Hz, LED backlight, capacitive touchscreen |
User-friendly display of operating status | Yes, with a dynamic temperature color background, animated operating status |
Multiple interfaces for easy switching | Minimalist main interface, program running interface, CCD visual switching, engineering interface, etc. |
Ethernet port | Built-in Gigabit Ethernet port |
Performance Upgrades | Explosion-proof, anti-glare, dustproof, waterproof, light-sensitive head (adjusts screen brightness automatically according to the environment), electromagnetic screen, 4G module, GPS, speaker |
Telligent self-check on startup | Yes, the system interface can also start self-check |
Parking information recording | Yes |
Fault self-diagnosis and reporting | Yes |
Estimated total time and remaining time | Yes |
Instrument index | Yes, evaluates product maintenance based on instrument usage conditions |
Touchscreen calibration function | Yes, (calibration can be initiated by long-press during self-check) |
Module temperature | Yes, (limited to factory mode only) |
System time | Yes, can set instrument date and time |
Key sound | Can be turned on and off |
Screen brightness adjustment | Yes, adjustable on multiple levels |
Language selection | Yes,switch system language (Chinese/English) |
System interface | Includes system settings,self-check, restore factory settings, software upgrade engineering interface (limited to factory mode),etc |
Help system | Product features, software characteristics, quick guide, fault codes, contact information |
WeChat service platform | Yes, when a fault occurs, users can send fault photos to the companys WeChat service platform via mobile phone |
Factory mode | Yes, only accessible to manufacturers with special passwords.Allows for system |
Normal Operating Conditions:
Operating temperature: 0~40;
Atmospheric pressure: 85.0kPa~106.0kPa
Relative humidity: 20%~80%
Power supply environment: 220V, 50Hz±1Hz, >15A, <600W
Area: Use in non-high temperature and high humidity areas
Transportation and storage conditions:
Ambient temperature: 15~30; <90%
Relative humidity: 20~30; <80%
The prompts for transportation and storage are reproduced on the outer packaging of this instrument. Labels such as Protection from rain, Stacking layers, Handle with care, and Fragile should be attached to the packaging box to ensure that these conditions are always met.
Instrument Structure
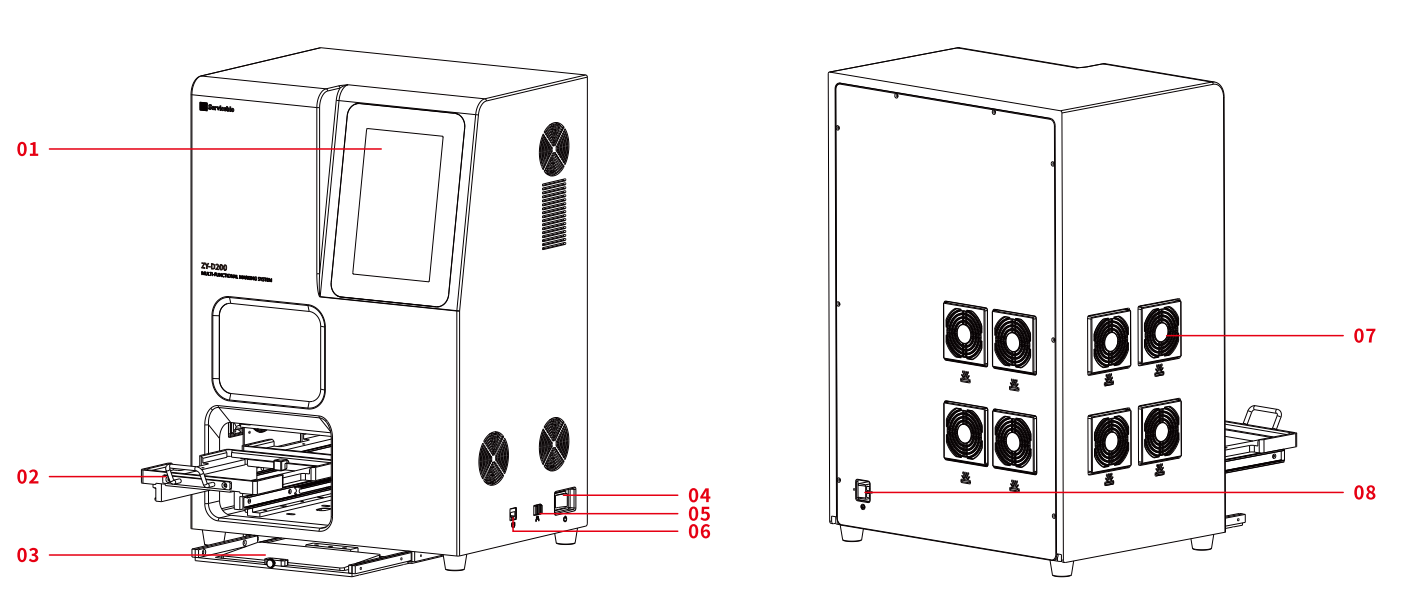
1 | Touch Screen Used to select pre-written marking programs.For users who are proficient in using the machine,they can also write their own marking content. |
2 | Carrier Adapter and Push-Pull Device Before marking,the carrier and the item to be marked must be placed in the carrier adapter according to the specified orientation.Push the adapter into the machine and let it magnetically attach before operating the system for marking. |
Note The positioning accuracy of the carrier adapter is high and has undergone precise calibration before delivery.Do not apply any force other than pushing and pulling on the carrier adapter and its push-pull device. | |
3 | Keyboard and Mouse Users who are not accustomed to using the touch screen can use a keyboard and mouse as alternatives. |
4 | Rocker Switch Controls the power on/off of the entire machine. |
5 | USB is Used for connecting external devices such as mouse and keyboard, and supports importing external marking data. |
6 | Rj45 Interface Network port supports internet connection. |
7 | Fan Cover For continuous use of the machine,the fan cover needs to be cleaned once a week.The specific cleaning method is to remove the cover with hands and shake off the dust from the primary filter cotton. Warning Do not disassemble the fan cover when the machine is powered on. |
8 | Power Socket National standard three-core power cord socket. |
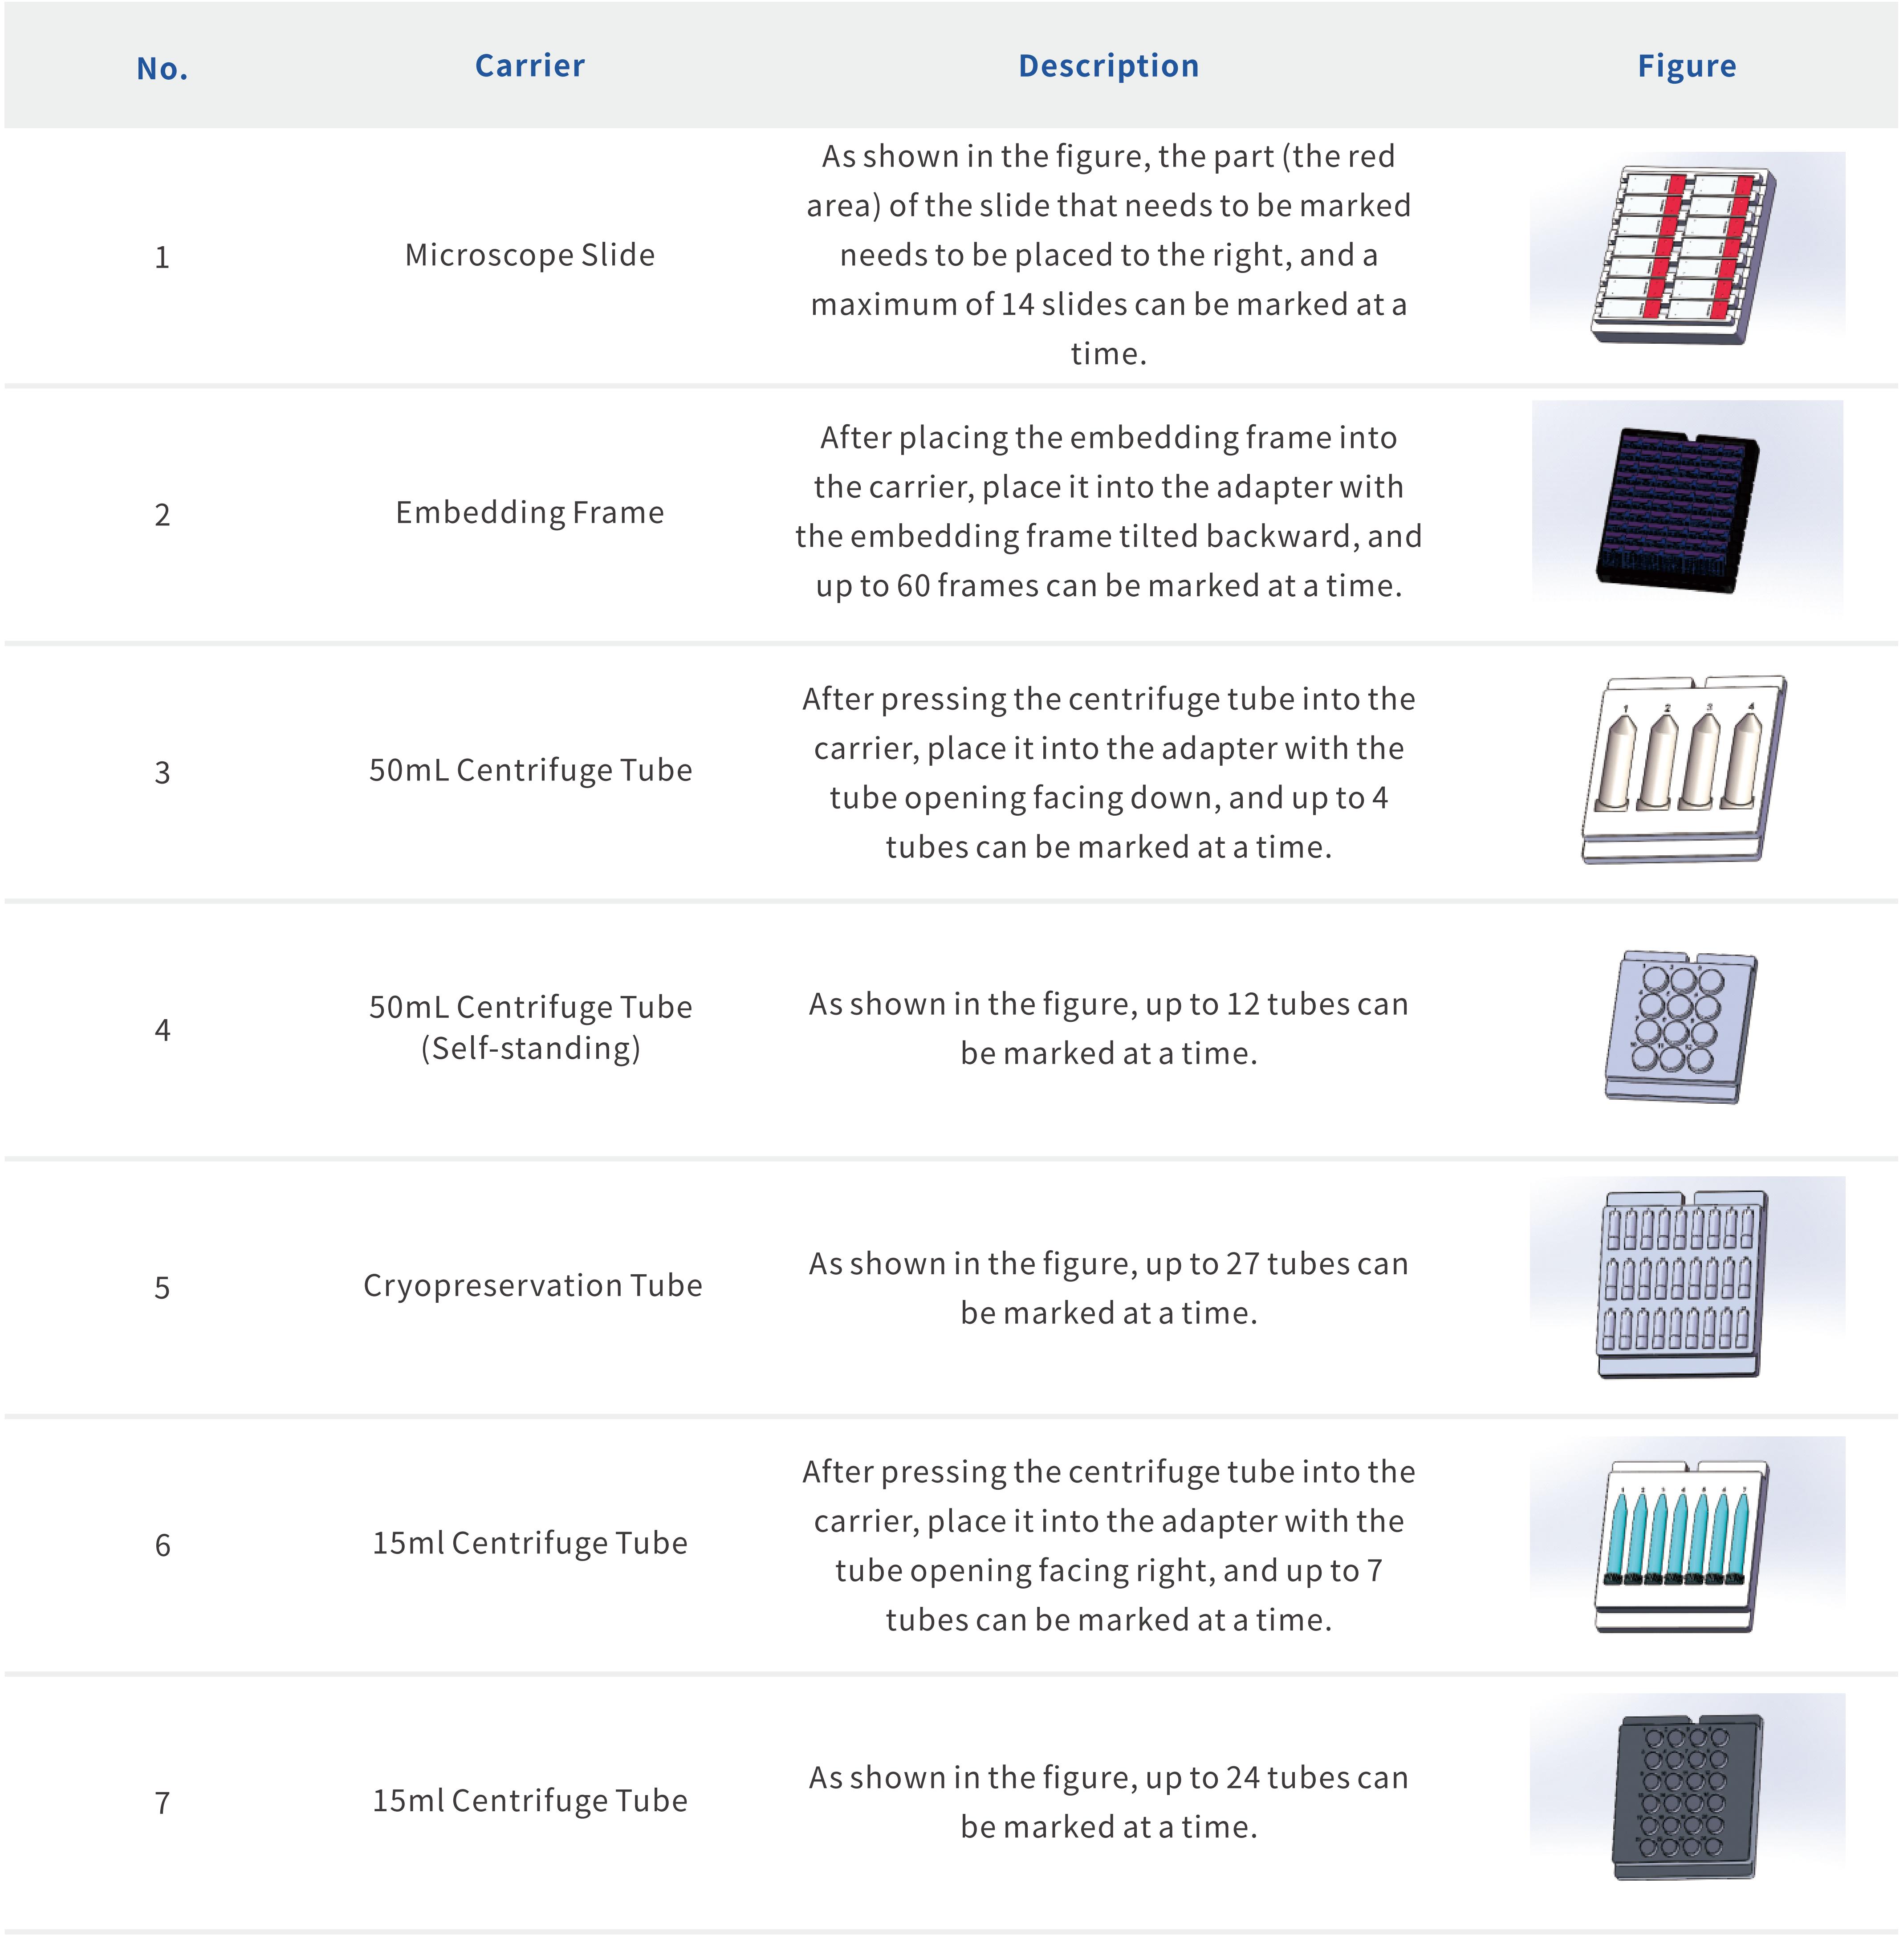
Carrier Introduction
The instrument currently has 7 types of carriers, including 50ml centrifuge tubes (including the cap and the body),15mlcentrifuge tubes (including the cap and the body), embedding frames, slides, cryovials

4.1.1 The red box 1 is a connection status indicator. The printing can only be done when it displays Connected Successfully.
4.1.2 The red box 2 is a button for switching between Chinese and English.
4.1.3 The red box 3 is an import button. After clicking, you can follow the guidance to select the Excel file that needs to be imported. The import function starts from the second row of the first column, with the first row of the first column defaulting as the header.
4.1.4 The red box 4 is the product selection area, which can be selected manually or automatically. After the software is properly turned on and displays Connected Successfully, pushing the adapter with the products into the marking machine will automatically select the corresponding printing interface based on the recognition results and jump to the corresponding interface.
4.1.5 The red box 5 is the Select All button. When no printing information is selected, selecting this switch will select all the information on the current page.
4.1.6 The red box 6 allows for single selection, allowing you to choose any one or multiple pieces of information individually.
4.1.7 The red box 7 is for region selection. After selecting this switch, choose one piece of information, then select another piece of information afterwards, and all the information between them will be selected.
4.1.8 The red box 8 is the toggle for the illustrated marking function.
4.1.9 The red box 9 is the printing information area, where you can manually input information or use the import function to input information.
4.1.10 The red box 10 is the Print button. After pushing in the adapter with products and selecting the information that needs to be printed, click this button to start printing.


