


Gel Imaging System
คุณสมบัติสินค้า:
SKU : SCG-W1000
หมวดหมู่ : Gel Documentation , 12. Lab Equipment , Laboratory Instrument , Servicebio ,
แบรนด์ : Servicebio
Share

Introduction
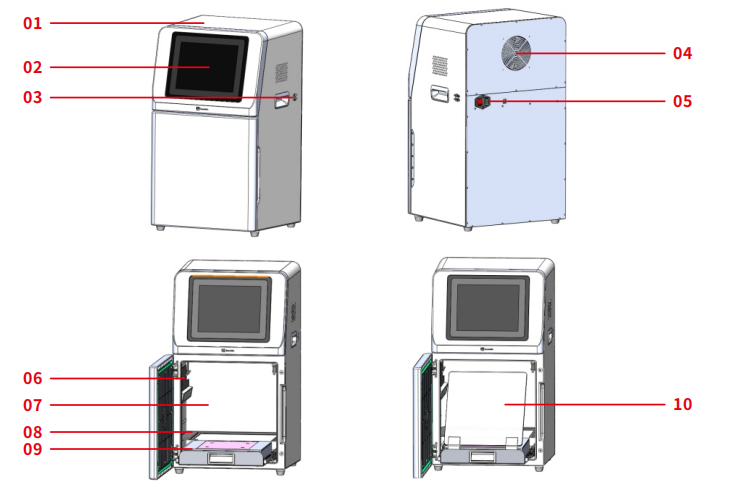
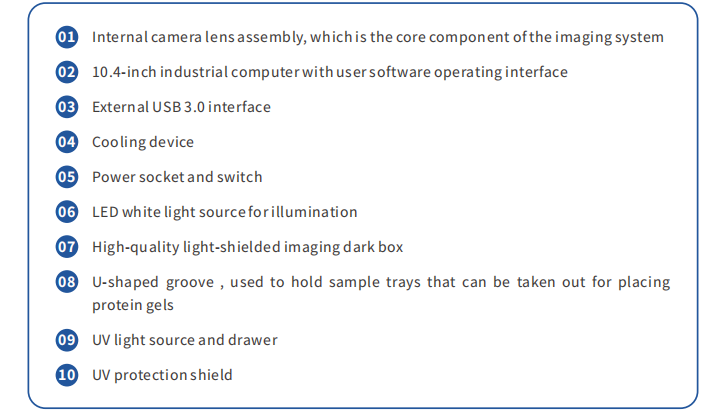
SCG-W1000 is a device for imaging gels, equipped with a high-sensitivity 6.3-megapixel camera for rapid, accurate, and high-throughput detection and imaging of samples. It is widely used in the fields of life sciences, medicine, and environmental protection.
Product Features
Three modes and multiple parameters can be flexibly adjusted, resulting in clear and bright imaging;
UV laser protective plate, ensuring both safety and convenience in gel cutting.
Technical Specifications and Precautions
| Technical Specifications | ||
| Product Name | Gel Imaging System | |
| Cat.No. | SCG-W1000 | |
| Dimensions | 400×371×700mm | |
| Camera | PixelResolution | 6.3 million pixels |
| Resolution | 3072×2048 | |
| Pixel Size | 2.4×2.4μm | |
| Target Size | 1/1.8(7.37×4.92mm) | |
| Full Well Capacity | 10.4ke- | |
| Sensitivity | 760mv | |
| Readout Noise | 2.14e- | |
| Dark Current | 0.15mV | |
| Signal-to-Noise Ratio | 40.2dB | |
| Exposure Time | 17us-15s | |
| Binning Mode | 1×1,2×2,3×3,4×4 | |
| Grayscale | 8-bit(256levels) | |
| Camera Type | Black and White Camera | |
| Lens | Aperture | F1.0-F16 |
| Focal Length | 8-48mm | |
| Type | Motorized zoom lens | |
| close-up lens | 2 times | |
| Filter | 590/60nm | |
| Light Source | Bright Field Light Source | Downward-facing LED white light source,symme trically distributed on both sides |
| UV Light Source | 310nm LED array with uniform transmission illumination | |
| Light Isolation | Fully light-sealed, isolates environmental light | |
| Dark Box | Door Control | Door control sensor can control the on/off of the bright field light source |
| Field of View | Effective field of view is140×140 mm | |
| Gel Cutting | After opening the door,the UV light source can be pulled out cutting,in conjunction with a UV protection shield | |
| Software Functions | Camera Settings | Adjust contrast, exposure time, and gain |
| Lens adjustment | Choose adjustment range: coarse adjustment, fine adjustment, super-fine adjustment Lens: Zoom, focus, aperture adjustment | |
| lmage cropping | Image cropping: Crop the necessary parts of the bands | |
| Industrial Computer | 10.4 inches, 1024×768, Windows operating system | |
| External Interfaces | USB 3.0×2 | |
| Operating Voltage | 100 V - 240 V | |
| Product Power | 100 W | |
| Product Net Weight | 30 Kg | |
| Cat. No. | SCG-W5000 | SCG-W3000 | SCG-W1000 |
| Dimension | 400×371×700 mm | 400×371×700 mm | 400×371×700 mm |
| Camera | Depth-cooled high sensitivity camera | Depth-cooled high sensitivity camera | High-sensitivity camera |
| Resolution | 2992*3000,9 megapixels | 2992*3000, 9 megapixels | 3072*2048,4.2 megapixels |
| Pixel | 3.76×3.76 μm | 3.76×3.76 μm | 2.4×2.4 μm |
| Shooting Area | Effective field of view for blotting film/protein gel: 136×136 mm (can be expanded to 200×200 mm if required); Effective field of view for nucleic acid gel: 200×200 mm. | Blotting Film 136×136 mm (expandable to 200×200 mm if required) | Nucleic Acid Gel / Protein Gel 140×140 mm |
| Cooling Temperature | Relative ambient temperature -40°C | Relative ambient temperature -40°C | - |
| Light Source | Bright-field Light Source: Downward-facing LED white light source, symmetrically distributed on both sides. UV Light Source: 310 nm LED array for uniform transmission illumination. | Downward-facing LED white light, symmetrically distributed on both sides | Bright-field Light Source: Downward-facing LED white light source, symmetrically distributed on both sides. UV Light Source: 310 nm LED array for uniform transmission illumination. |
| Industrial Computer | 10.4 inches, 1024×768 Windows operating system | 10.4 inches, 1024×768 Windows operating system | 10.4 inches, 1024×768 Windows operating system |
| External Interface | 2 USB3.0 | 2 USB3.0 | 2 USB3.0 |
| Working Voltage | 100 V-240 V | 100 V-240 V | 100 V-240 V |
| Product Power | 100 W | 100 W | 100 W |
| Net Weight | 30 kg | 25 kg | 30 kg |
| Real-Time Imaging | Yes | Yes | - |
| Time Imaging | Yes | Yes | - |
| Time Accumulation | Yes | Yes | - |
| Auto Exposure | Yes | Yes | Yes |
| Choice of 3 Imaging Modes | Yes | Yes | - |
| Protein Gel/Nucleic Acid Gel Imaging | Yes | - | Yes |
| Nucleic Acid Gel Cutting | Yes | - | Yes |
Operating Procedures
Power On
Plug in the power cord and turn on the power switch at the back of the instrument. The industrial computer will start up.
Sample Loading
Protein Gel: Open the instrument door, take out the white sample tray, place the prepared text sample on the tray, and then place the tray flat in the groove inside the instrument dark box. Close the instrument door.
Nucleic acid gel: Open the instrument door, place the sample on the UV-transmitting glass of the UV light source module. There are markings on the UV glass surface indicating the sample placement area.
Launching the Imaging Software
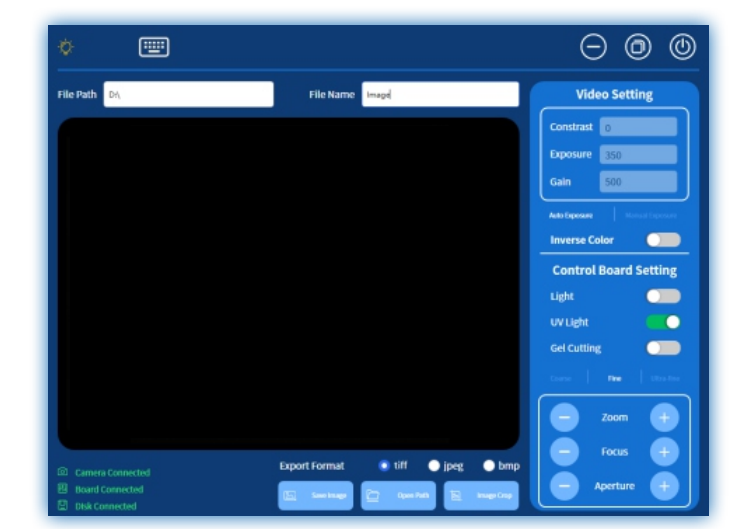
Preview and Capture Pages
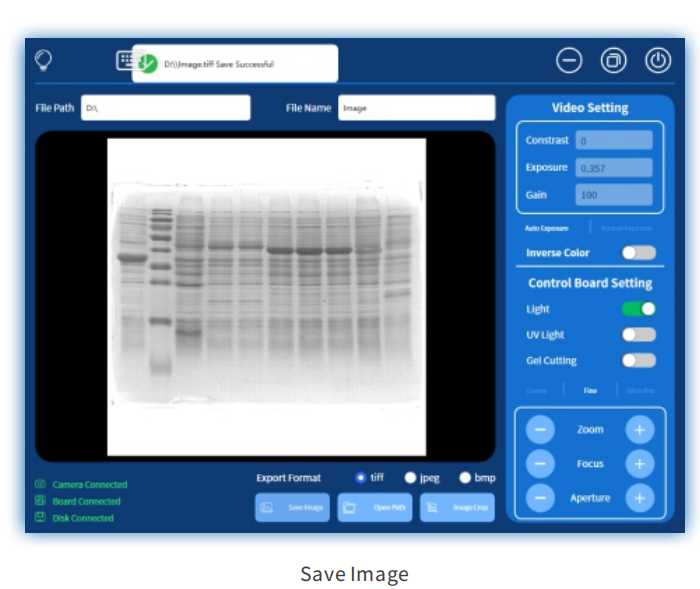
The preview and capture page includes status display information, camera settings, lens settings, mode settings, image saving and cropping, etc.
The top bar includes UV light source status indicator, keyboard open button, minimize, window restore, exit gel imaging; file path input for saving the location of the image, file name input for saving the name of the image.
The middle window displays real-time images taken by the camera.
The bottom bar includes camera/control board/mobile disk connection status display information, image format selection for saving (TIFF/JPEG/BMP), save image button, open image path, image crop button.
The right sidebar is for camera settings, mode settings, and lens settings area, details are as follows:
Video Settings Double-clicking "Video Setting" will center the image
Contrast Brightness adjustment, range -100~ 100, default value 0, increasing the value makes the image brighter, decreasing the value makes the image darker
Exposure Set exposure time in milliseconds, default time 350ms, increasing the time makes the image brighter Gain Set gain value, default value 500%, range 100%~5000%, increasing the gain makes the image brighter
Auto Exposure Automatic exposure mode, the camera automatically adjusts exposure time and gain Manual Exposure Manual exposure mode, manually set exposure time and gain
Inverse Color Black and white color inversion
Lighting Turn on/off the LED lighting, used for shooting protein gel mode
UV Light Turn on/off the UV light source, can only operate on/off when the door is closed, used for shooting nucleic acid gel mode
Gel Cutting Turn on/off the gel cutting mode, can only operate on/off when the door is open, when opening gel cutting, the UV light source will also automatically turn on, used for cutting gel, the UV protection shield must be placed before opening gel cutting
Adjustment Mode Select the zoom, focus, and aperture adjustment range of the electric lens
Coarse Adjustment Larger adjustment steps, zoom adjustment step 200, focus adjustment step 1000, aperture adjustment step 200, when the image is completely blurry, coarse adjustment can quickly make the image relatively clear
Fine Adjustment Moderate adjustment steps, zoom adjustment step 50, focus adjustment step 250, aperture adjustment step 50, after coarse adjustment, fine adjustment can make the image clearer
Super Fine Adjustment Smaller adjustment steps, zoom adjustment step 5, focus adjustment step 25, aperture adjustment step 5, can make the image in the clearest state
Zoom Increase and decrease field of view by clicking "-" and "+" buttons Focus Adjust image clarity by "-" and "+" buttons
Aperture Adjust image brightness by "-" and "+" buttons
Capturing Process
1.Select automatic exposure, default contrast is 0, default exposure is 350, and default gain is 500 .
2. For nucleic acid gel: Click on the UV light, turn on the UV light source, then the bands can be seen in the window.
For protein gel: Click on the illumination, turn on the bright field light source, then the bands can be seen in the window.
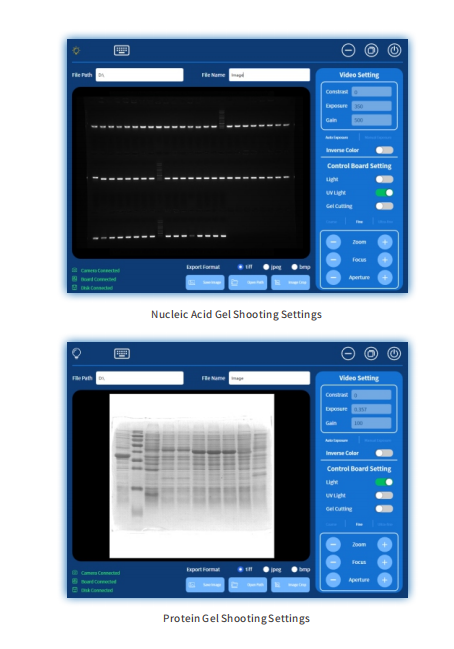
3.Adjust the "zoom" to fill the field of view with bands, or adjust to the experimenter 's desired field of view.
4.Adjust the "aperture," first adjust to the maximum, then click " " twice for fine adjustment, and the aperture is set to 3 .
5.Adjust the "focus " to make the image as clear as possible; in rare cases, if the results of fine adjustment and super-fine adjustment are still not clear enough, adjust to reduce the "aperture," then focus to obtain the clearest image.
6.Enter the file path and file name, click "Save Image" to save the current image.
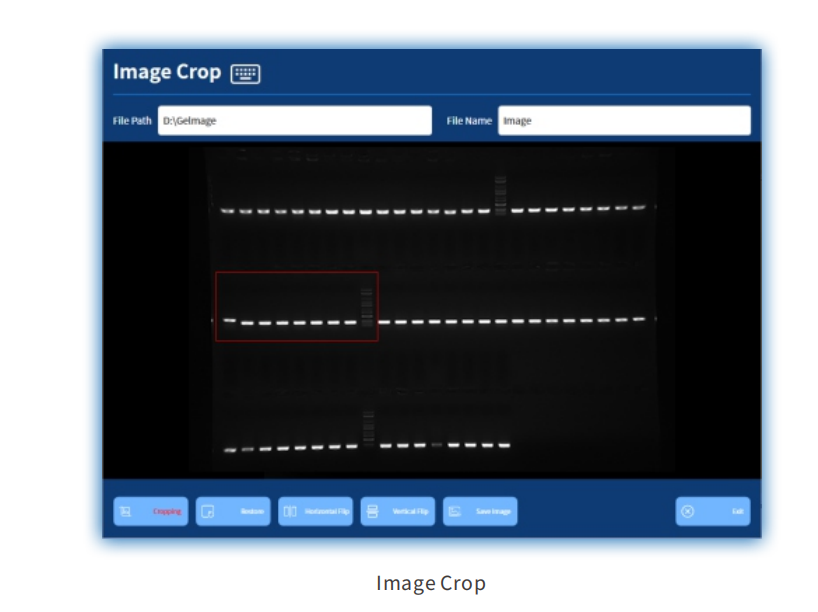
6. If only part of the bands is needed, click on " image crop" to enter the image cropping page. Slide the screen from the upper left corner of the desired band to its lower right corner, and a red box will appear to outline the band. Double-click on any position inside the red box to zoom in the band to fill the entire window; Horizontal flip and vertical flip can be used to flip the band along the horizontal and vertical directions, while restore can return the band to its original state before flipping; After adjusting the band to the desired state, enter the file path and file name, then click "Save Image " to save the current image; Click " Exit " to return to the preview and shooting page. If any adjustments are made to the image on the results page
Gel Cutting
1.Open the instrument door, the UV light source will automatically turn off.
2. Pull out the drawer of the UV light source, place the UV protective shield diagonally between the drawer and the instrument to shield the eyes from the UV light source.

3.Click on "Gel Cutting," the UV light source will turn on. At this point, the bands of the nucleic acid gel can be observed, and the gel cutting action can be performed.
Product Packing List
No. | Name | Specifications | Quantity |
1 | Gel Imaging System | SCG-W1000 | 1 |
2 | Sample Tray | 1 | |
3 | UV protective shield | 1 | |
4 | Mouse | 1 | |
5 | Mouse Pad | 1 | |
6 | Keyboard | 1 | |
7 | Power Cord | 250 V - 10 A | 1 |
8 | Certificate of Conformity | 1 | |
9 | User Manual | 1 |


