


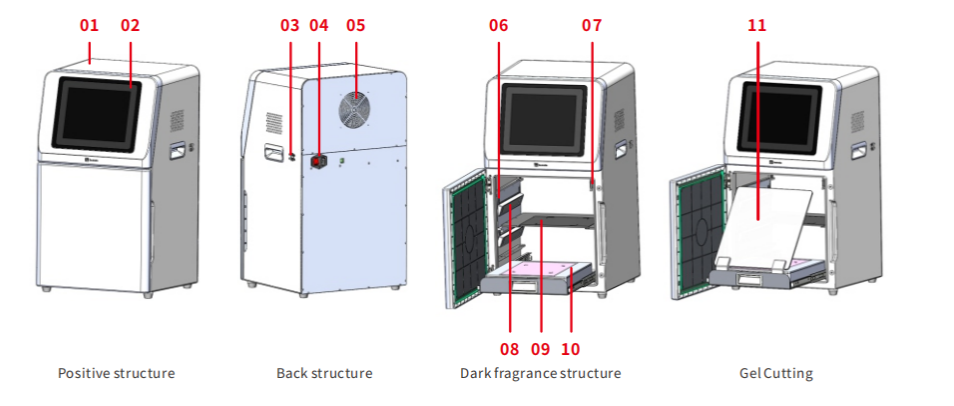
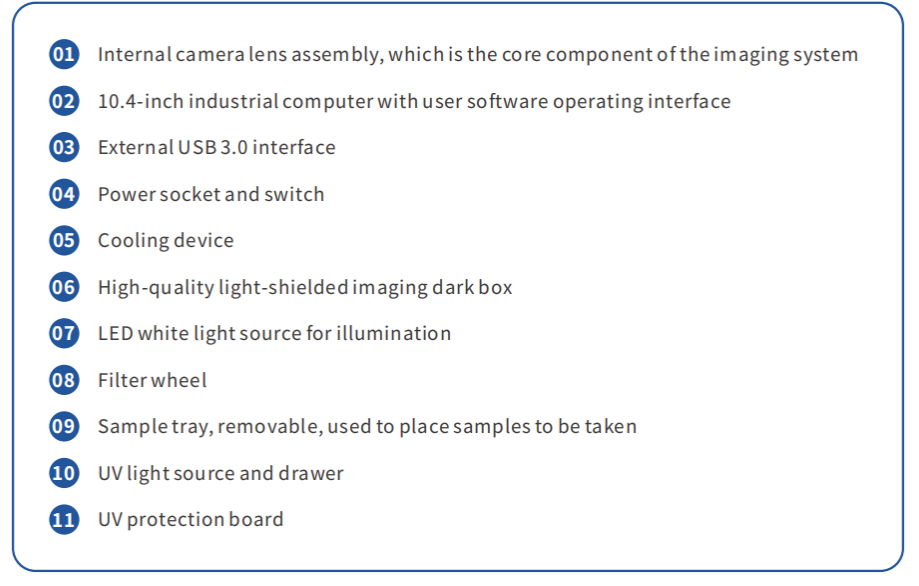
Products
Instruments
SKU : SCG-W5000
Categories : Gel Documentation , 12. Lab Equipment , Laboratory Instrument , Servicebio ,
Brand : Servicebio
Share
Multi-functional Imaging System
Integrated with a chemiluminescence system and a gel imaging system, it can be used for experiments such as Western Blotting membrane detection, nucleic acid gel imaging/gel cutting, and protein gel imaging.
Product Information
The SCG-W5000 is a comprehensive device that integrates chemiluminescence technology and gel imaging. it is
equipped with a high-sensitivity cooled camera with 9 million pixels, enabling rapid, accurate, and high
throughput detection and imaging of samples. it is widely used in the fields of life sciences, medicine, and
environmental protection.
Product Features
Chemiluminescence Imaging System :
1. Weak band signal, one-time imaging
2. Both strong and weak band signals can be achieved, and the desired results can be obtained
3. Source file can be saved, and the image can be adjusted at any time
4. High Efficient
Gel Imaging System:
Three modes and multiple parameters can be flexibly adjusted, resulting in clear and bright imaging
UV laser protective board, safe and convenient for gel cutting
TechnicalSpecifications
| Product Name | Multi-functional Imaging System | |
| Cat.No. | SCG-W5000 | |
| Dimensions | 400×371×700 mm | |
| Camera | PixelResolution | 9 million |
| Resolution | 3000×3000 | |
| Pixel size | 3.76×3.76μm | |
| Target size | 1(11.28×11.28 mm) | |
| Full Well Capacity | 16.5ke-(HCG),50.5ke-(LCG) | |
| Sensitivity | 877mv@1/30s | |
| ReadoutNoise | 1.24e-(HCG),3.22e-(LCG) | |
| Dark Current | 0.0003e-/s/pixel@-15 | |
| Signal-to-Noise Ratio | 42.2dB(HCG),47dB(LCG) | |
| ExposureTime | 0.1ms~1h | |
| Binning Mode | 1×1,2×2,3×3 | |
| Grayscale | 16-bit(65536 levels) | |
| Cooling | Relative to Ambient Temperature -40°c | |
| Camera Type | Black and White Camera | |
| Lens | Aperture | F0.95-F16 |
| Focal Length | 17mm | |
| Type | Motorized zoom lens | |
Light Source | Bright Field Light source | Downward-facing LED white light source, symmetrically distributed on both sides |
| Ultraviolet light source | 310nm LED array, providing uniform transmissive illumination. | |
| Dark Box | Light isolation | Fully light-sealed, isolates environmental light. |
| Rotating disc | The door control sensor can control the on/off of the bright field light source. | |
| Rotating disc | Switch the filter according to the current mode to match the applications of chemiluminescence and gelimaging. | |
| Field of View | Effective field of view for membraneimagingis136mmxl36mm (expandable to200mmx200mm if necessary) Effective field of view for proteingelimagingis136mmx 136mm (expandableto200mmx 200mmifnecessary) The effective field of view for nucleic acid gel imaging is 200mmx200mm | |
| Gel Cutting | After opening the door, the UV light source can be extracted and used with aUV protective board for cutting adhesive | |
Software Functions | Exposure Modes | High Quality: Image quality is the highest |
| Auto Exposure | Intelligent exposure technology quickly determines the optimal exposure time. With the combination of time imaging and time accumulation functions, users can achieve the best image results with just one operation. | |
| Real-time imaging | Real-time presentation of the changes in sample signals during the exposure process. allowing for the observation of every detail of the capture. Overexposed areas will be indicated for samples with overexposure. | |
| Time imaging | After exposure is complete, each frame image within the exposure time can be generated Through precise retrospective adjustments, users can choose any frame image within that exposure time as the final output. | |
| Time Accumulation | For samples with insufficient exposure, users can choose to continue exposure after the initial exposure is completed, enabling the sample to receive additional exposure on top of the already exposed time. | |
| IndustrialComputer | 10.4 inches,1024x768,Windows operating system | |
| ExternalInterfaces | USB 3.0×2 | |
| Operating Voltage | 100V-240V | |
| ProductPower | 100W | |
| Product Net Weight | 30Kg | |
Notes
It is prohibited to touch or scratch the internal lenses of the dark box with hands or sharp objects
After placing the experimental samples, make sure to close the instrument's flip door to prevent external light from entering
the dark box and affecting the experimental results
During imaging experiments, shaking the experimental table or instrument is prohibited to avoid impacting the image
quality.
Pay attention to electrical safety. Pullingor moving the power cord during the experiment is prohibited
After the experiment is completed, clean the samples and any residues inside the dark box thoroughly
| Cat. No. | SCG-W5000 | SCG-W3000 | SCG-W1000 |
| Dimension | 400×371×700 mm | 400×371×700 mm | 400×371×700 mm |
| Camera | Depth-cooled high sensitivity camera | Depth-cooled high sensitivity camera | High-sensitivity camera |
| Resolution | 2992*3000,9 megapixels | 2992*3000, 9 megapixels | 3072*2048,4.2 megapixels |
| Pixel | 3.76×3.76 μm | 3.76×3.76 μm | 2.4×2.4 μm |
| Shooting Area | Effective field of view for blotting film/protein gel: 136×136 mm (can be expanded to 200×200 mm if required); Effective field of view for nucleic acid gel: 200×200 mm. | Blotting Film 136×136 mm (expandable to 200×200 mm if required) | Nucleic Acid Gel / Protein Gel 140×140 mm |
| Cooling Temperature | Relative ambient temperature -40°C | Relative ambient temperature -40°C | - |
| Light Source | Bright-field Light Source: Downward-facing LED white light source, symmetrically distributed on both sides. UV Light Source: 310 nm LED array for uniform transmission illumination. | Downward-facing LED white light, symmetrically distributed on both sides | Bright-field Light Source: Downward-facing LED white light source, symmetrically distributed on both sides. UV Light Source: 310 nm LED array for uniform transmission illumination. |
| Industrial Computer | 10.4 inches, 1024×768 Windows operating system | 10.4 inches, 1024×768 Windows operating system | 10.4 inches, 1024×768 Windows operating system |
| External Interface | 2 USB3.0 | 2 USB3.0 | 2 USB3.0 |
| Working Voltage | 100 V-240 V | 100 V-240 V | 100 V-240 V |
| Product Power | 100 W | 100 W | 100 W |
| Net Weight | 30 kg | 25 kg | 30 kg |
| Real-Time Imaging | Yes | Yes | - |
| Time Imaging | Yes | Yes | - |
| Time Accumulation | Yes | Yes | - |
| Auto Exposure | Yes | Yes | Yes |
| Choice of 3 Imaging Modes | Yes | Yes | - |
| Protein Gel/Nucleic Acid Gel Imaging | Yes | - | Yes |
| Nucleic Acid Gel Cutting | Yes | - | Yes |
Functional Description
Operating Procedures
Chemiluminescence Imaging Application
Power on
Plug in the power cord and turn on the power switch at the back of the instrument. The industrial computer will
start up.
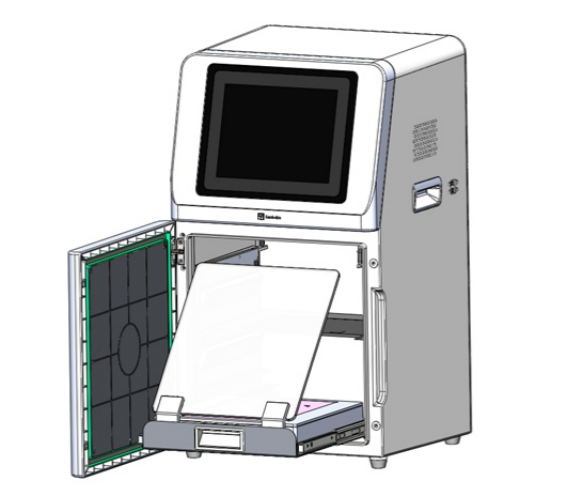
Sample Loading
Open the instrument door, take out the sample tray, place the prepared text sample on the tray, and then place
the tray flat in the groove inside the instrument dark box.Closetheinstrumentdoor.
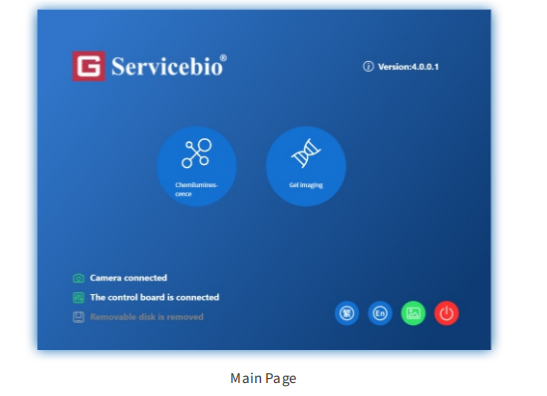
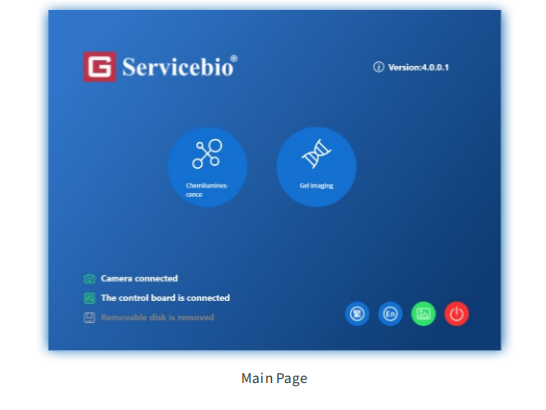
Launchinglmaging Software
After the industrial computer starts up, the application software will be automatically loaded. 0ncethe software
is successfully launched, it will navigate to the main page.
The top-left section displays the company logo.
The bottom-left section is the status bar, showing the current camera and control board connection status, as
well as detection of the inserted removable disk.
The top-right section displays the software version number.
The bottom-right section includes buttons for switching between simplified/traditional Chinese, switching to
English, exporting the page, and closing the program.
Clicking on the central icon will enter the preview and capture page
Clicking on the Chemiluminescence will enter the preview and capture page
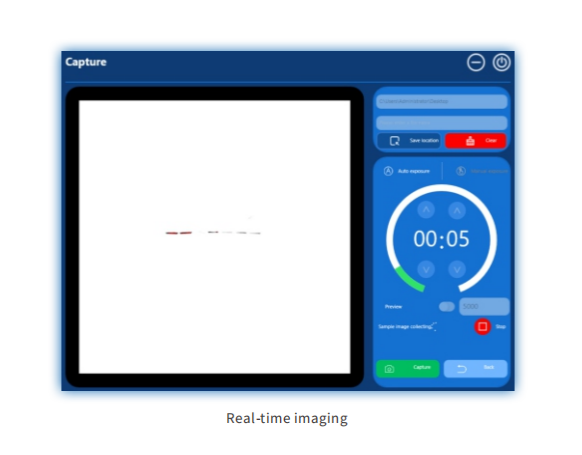
Preview and Capture Page
On the preview page, the user needs to input the location for storing the experimental results. The file name is
optional and facilitates file retrieval for the user.
The user can choose between manual exposure and automatic exposure as the current experimental mode.
For manual exposure, the user needs to input the exposure time, while for automatic exposure, the algorithm
calculates the optimal exposure time.
On the right side of the preview, the user can input a time value in microseconds (us). This time represents the
exposure time for the bright field image. Clicking the preview switch initiates the preview, and the preview time
can be adjusted as needed.
Clicking the capture button starts the exposure for capturing the image while clicking the return button takes
the user back to the main page.

Shooting Process
1. Select automatic exposure and set the preview time.
Automatic exposure intelligent exposure technology can quickly determine the optimal exposure time.
2. Real-time making
Click on the capture button to start the exposure. A strip is displayed on the left, and a countdown of the
exposure time is shown on the right. As the countdown progresses, real-time imaging of the sample signal
changes is displayed on the left.
Real-time imaging Presents the changes in the sample signal during the exposure process in real-time,
allowing users to grasp every detail of the capture. This breakthrough feature not only enhances shooting
efficiency but also greatly improves user interaction experience.
During real-time imaging, areas in the strip that are overexposed will be displayed in red. lf it is determined that
the strip meets the requirements, you can click on the stop button in the lower right corner to end the exposure
early.
3. Temporallmaging, Time Accumulation
After the exposure is complete, it automatically enters the results page, where adjustments can be made to the
captured results.
Temporal Imaging Through precise retrospective adjustment, users can select any frame within the exposure
time as the final output result.
Time Accumulation Even after the exposure is complete, users can choose to continue the exposure, allowing
the sample to receive additional exposure based on the already-exposed time. When clicking "Continue
Exposure," there is a prompt for the minimum exposure time. The set time needs to be greater than this minimum
time. lf the set time is shorter than this minimum time, the actual exposure time will be the minimum exposure
time indicated by the prompt.
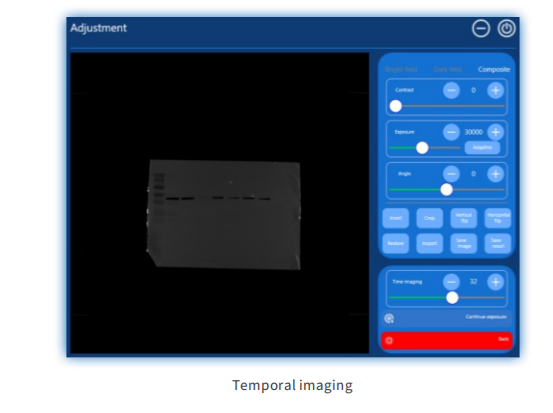
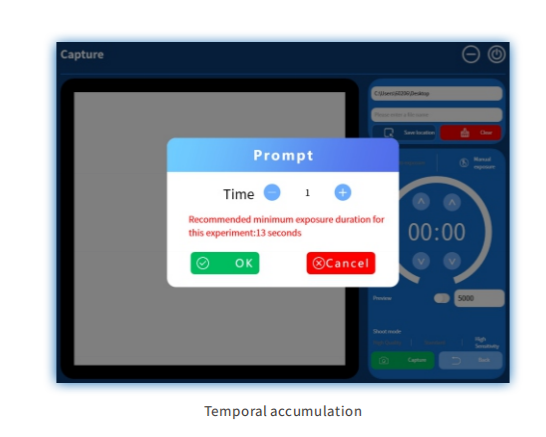
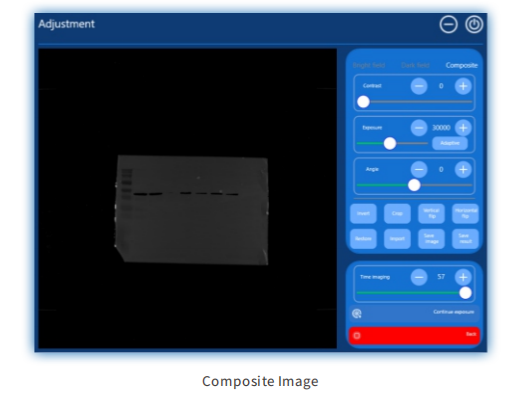
Image adjustments, result saving
After obtaining satisfactory images through automatic exposure, continued exposure, and temporal imaging
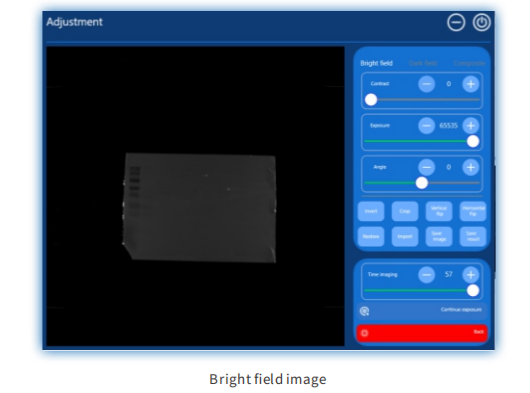
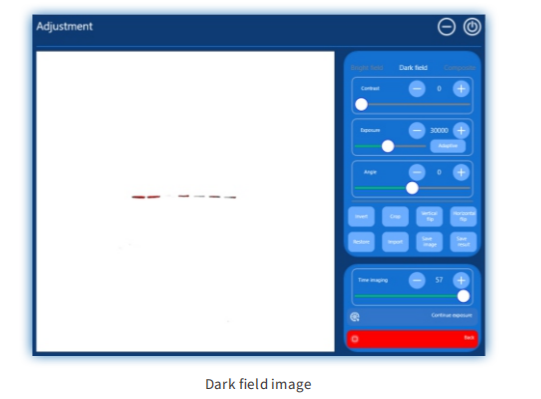
adjustments can be made to the brightfield image, dark field image, and composite image on the results page.
Contrast Adjust the brightness and darkness of the bright field image
Exposure Adjust the lightness and darkness of the dark field image, Clicking on "auto-adapt" can recommend
the most suitable value
Rotation Rotate the image
Invert Apply an inverted color effect to the image, turning black into white and white into black
Crop Clicking on the crop will generate a region on the image. This region can be resized, and after selecting the
appropriate size clicking on crop again will crop out the desired area
Vertical flip Flips the image vertically
Horizontal flip Flips the image horizontally
Restore Restores the image to its original state
Im port Select the file automatically saved by the program to import it into the program for further operations
Image saving Save the image and also save the bright field image, dark field image, and composite image
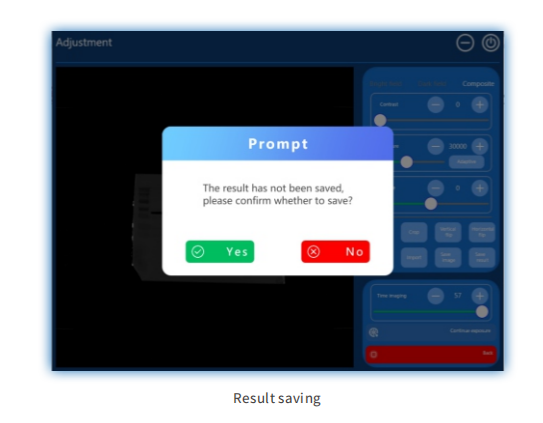
Result saving Save the adjusted image as an encrypted file
If any adjustments are made to the image on the results page
Export Page

Storage location Select the location of the image files automatically saved by the system, and the contents of
the files will be displayed in a list format the system
Open file Open the selected directory
Export Selecttheexport contentandformat to exportthe images
Delete Select the image file to be deleted,and it will be deleted
Open Select the corresponding file in the list to open and jump to the result page. You can operate on the image
on the result page, or double-click the corresponding file to open it
Return Click "return" to return to the main page
Gel Imaging Application
Power on
Plug in the power cord, turn on the power switch at the back of the instrument, and the industrial computer will
start up.
Sample Loading
Protein Gel Open the instrument door, take out the white sample tray, place the prepared sample to be tested
on the tray, then place the tray flat in the groove inside the instrument dark box, and close the instrument door.
Nucleic Acid Gel Open the instrument door, place the sample on the ultraviolet transmissive glass of the
ultraviolet light source module, with markings on the surface of the ultraviolet glass indicating the range for
placing the sample.
Load Application software
After the industrial computer starts up, the application software is automatically loaded. Once the software
starts up normally, it will navigate to the main page.
The upper left part displays the company;
The lower left part is the status bar, showing the connection status of the current camera and control board, as
well as the detection of inserted removable disks;
The upper right part displays the software version number;
The lower right part includes buttons for switching between simplified and traditional Chinese, switching to
English, accessing the export page, and closing the program;
Clicking on the icon in the middle and selecting, "Gel lmaging" will take you to the preview and capture page.
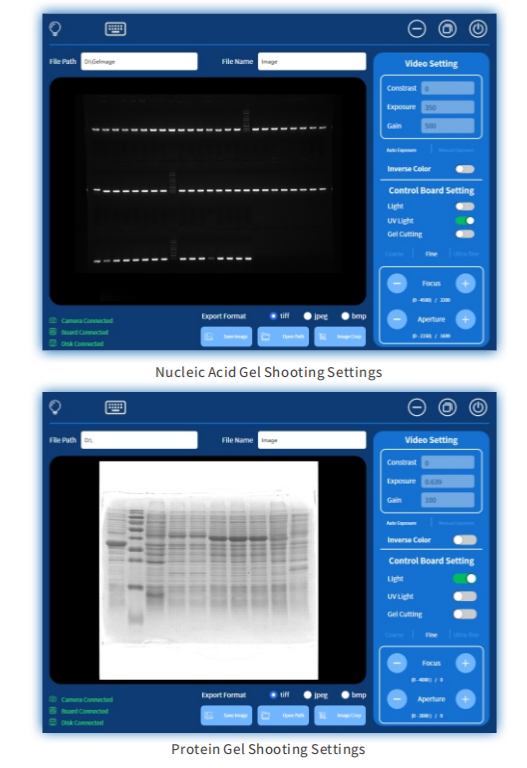
Preview and Capture Page
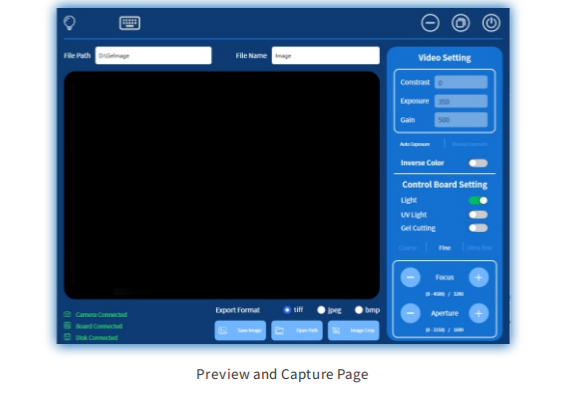
Preview and capture pages include status display information, camera settings, lens settings, mode settings,
image saving, and cropping, etc.
The top bar consists of a light source status indicator, keyboard open button, minimize, window restore, exit gel
imaging; file path input to save the location of the image, file name input to save the name of the image.
The middle window displays real-time captured images from the camera.
The bottom bar includes camera/control board/mobile disk connection status display information, image
format selection for saving (tiff/jpeg/bmp), save image button, open image path, and image cropping button.
The right is for camera settings, mode settings, and lens settings, which are described as follows:
Video settings Double-click" Video Settings" to center the image
Contrast Adjusts brightness, range -100~100, default value is 0, increasing the value makes the image brighter,
decreasing the value makes it darker
Exposure Sets the exposure time in milliseconds, default time is 350ms, increasing the time makes the image
brighter
Gain Sets the gain value, default value is 500%, range 100%~5000%, increasing the gain makes the image
brighter
Auto Exposure In Automatic exposure mode, the camera automatically adjusts exposure time and gain
Manual Exposure Manual exposure mode, manually set exposure time and gain
Negative Film Inverts blackand white colors
lllumination Turnson/off the illumination LED, used for capturing protein gel mode
UV Light Turns on/off the UV light source, can only be operated when the door is closed, used for capturing
nucleic acid gel mode
Gel cutting, Turns on/off the gel cutting mode, and can only be operated when the door is open, when gel cutting is
turned on, the UV light source will also automatically turn on, UV protective plate must be placed before opening
Adjustment Mode Adiuststhefocusand aperture range of the motorized lens
Coarse Adjustment Large adjustment step size, focusing adjustment step size of400, aperture adjustment step
size of 200, when the image is completely blurred, coarse adjustment can quickly bring the image to a relatively
clear state
Fine Adjustment Medium adjustment step size, focusing adjustment step size of 200, aperture adjustment step
size of40,after coarse adjustment,fine adjustment can make the image clearer
Ultra-fine Adjustment Small adjustment step size, focusing adjustment step size of 15, aperture adjustment
step size of 15 can bring the image to the clearest state
Focus Adjusts the focal length range (0-4500) through the "." and "+" buttons, the value below indicates the focus
motor adjustment step range and real-time step
Aperture Adjusts the aperture range (0-2150) through the "." and "+" buttons, the value below indicates the
aperture motor adjustment strange and real-time step
Shooting Process
1. Select auto exposure, default contrast is 0, default exposure is 350, default gain is 500.
2. Nucleic Acid Gel: Turn on UV light, open the UV light source, then the bands can be seen in the window
Protein Gel: Turn on illumination, open the bright field light source, then the bands can be seen in the window.
3. Adjust the focus to make the bands as clear as possible
4. The default aperture step is 1700, which can be adjusted as needed. It is not recommended to adjust it too large
or too small. It is recommended to adjust it in the range of 1500-1900. The aperture is mainly used to adjust the
brightness of the bands, lf adjusting the aperture does not achieve the desired brightness of the bands, switch to
manual exposure and set the exposure time, which can significantly change the brightness.
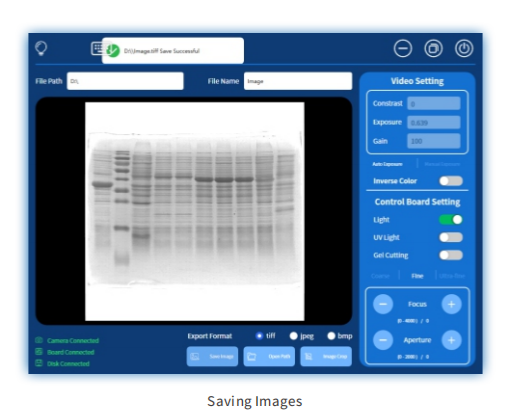
5. Enter the file path and filename, then click"Save Image" to save the current image.
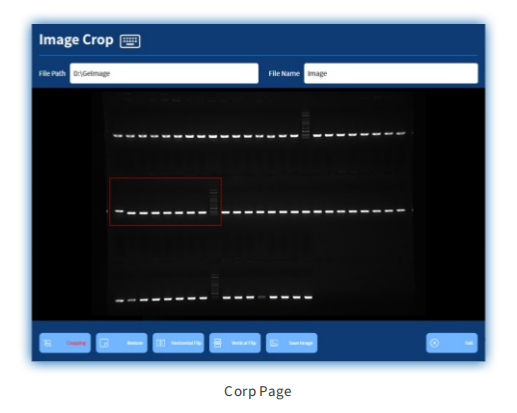
If only certain bands are needed, click on "image Crop" to enter the image cropping page. Slide the screen from
the upper left corner of the desired band to its lower right corner to create a red box outlining the band. Double.
clicking on any position within the red box will enlarge the band to fill the entire window.
Horizontal and vertical flips can be used to flip the bands along the horizontal and vertical directions, and
'Restore" can return the bands to their original state before flipping.
Once the bands are adjusted to the desired state, enter the file path and filename.
Click "Save image" to save the current image. Click"Exit" to return to the preview and shooting page.
Gel cutting
1.0pen the instrument door, and the UV light source will automatically turn off.
2. Pull out the drawer containing the UV light source and place the UV protective shield diagonally on the drawer
and the instrument to block the UV light source from direct exposure to the eves.
Click on "Cutting Gel," the UV light source will turn on, and at this point, the bands of nucleic acid gel can be
observed, and the gel cutting action can be carried out.
https://www.servicebio.com/goodsdetail?id=72859


")
