
")
")
")
")
")
Products
Instruments
Homogenizer
Homogenizer
SKU : SWE-3D
Categories : 12. Lab Equipment , Homogenizers / Cell lysis , Servicebio ,
Brand : Servicebio
Share
Product Introduction
Tissue Homogenizer (3D, Frozen) adopts a special 3D operation mode, and the sample moves in a shape in space,making the frozen sample in the grinding tube collide with the grinding beads. The grinding shear force and impact force generated by the collision completely crush the tissue. It is a dedicated equipment for the rapid one-time processing of multiple samples in research institutions,universities,agricultural colleges, biomedical and food testing fields.
Product Features
1. shape operating mode for faster and more efficient grinding, completing the grinding of most sample tissues in just 30s.
2. A -20 low temperature freezing chamber to fulfill the requirements of low temperature experiments such as sample storage, electrophoresis, and membrane transfer.
3. Rapid grinding at low temperature throughout the process to prevent nucleic acid degradation and protein inactivation.
4. Capable of simultaneously processing up to 24 samples.
Product Parameters
Working Environment:
Power Supply | 200-240VAC (110V Available), 50-60Hz, 800W; Power supply fluctuation shall not exceed 10% of the rated value |
Indoor Temperature | 5-40 |
Relative Humidity | Max. 80% |
Operation Location | Indoor |
Technical Parameters:
Dimensions | 650×420×430 mm |
Weight | 54 kg |
Screen Size | 5 inches |
Temperature Control Accuracy | ±1 |
Working Time | Run time 0-9999s, pause time 0-999s, and run times 1-99 times |
Unpacking and Installation
01. Remove the tissue homogenizer from the packing box, place it on suitable location and confirm all the spare parts are complete.
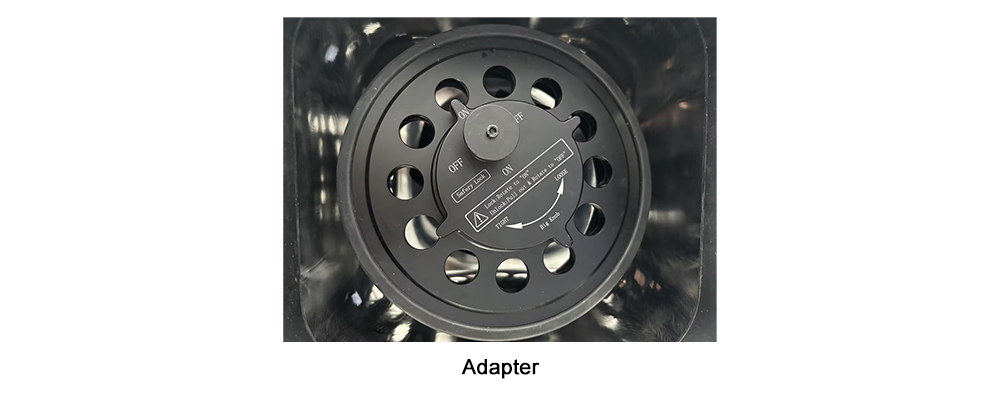
02. Open the top cover. Pull up the safety lock and rotate it to OFF to unlock it. Rotate the big knob counterclockwise until you can remove the adapter cover. Take out the adapter and remove the fixed pearl cotton inside the instrument.
03. Place instrument on level and horizontal test bench to prevent vibration during working.
04. Connect the power supply that matches the name plate (make sure the instrument has stood for 10h and the coolant is in position), turn on power switch behind the instrument.
05. Turn on refrigeration button of compressor and wait for 10-15 minutes, checking if the grinding room temperature reaches presetting value.
06. If the temperature reaches presetting value, properly install adapter and nut lock, then close top cover and start the instrument.
Samples Preparation
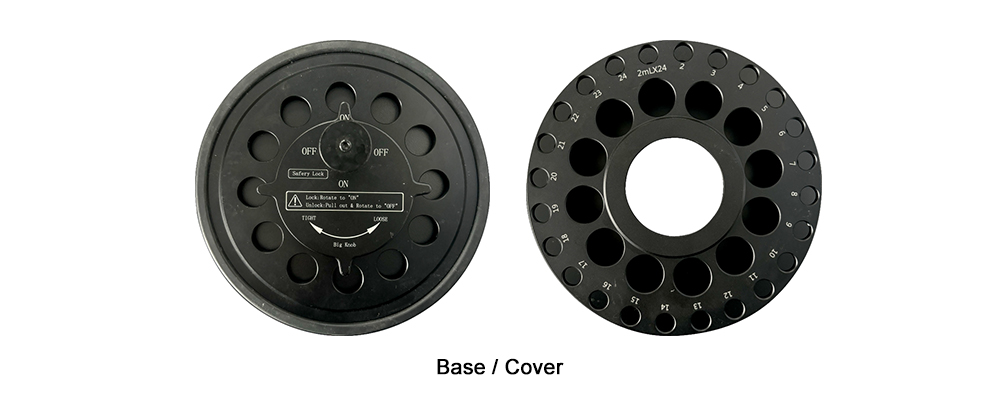
The adapter can grind 24 samples at the same time with standard 2ml centrifuge tubes. The adapter includes a base that can hold 24 centrifuge tubes, a top cover, and a screw lock.
Take the sample to be grinded and put it into the grinding tube. It is recommended that the amount of sample is not more than 100mg. Add the corresponding extraction solution, and keep the total volume of the sample and the extraction solution within 1/2 of the tube. Then add several grinding beads of appropriate size. To ensure the grinding efficiency and quality, for larger samples, it is recommended to cut them into small pieces with scissors first.
Loosen the adapter cover plate and place the centrifuge tubes (the grinding tubes must be placed symmetrically and balanced). Before starting the grinding, please ensure that the big knob is tightened first, followed by the safety lock.
Operating Instructions
1. Operating Steps
01. Insert the power cord of the instrument into a grounded power socket that matches the name plate, and turn on the power switch on the side of the instrument.
02. After the startup interface appears, wait for approximately 5 seconds to enter the main operating interface.
03. Put the grinding tube into the adapter, tighten the big knob and the safety lock in sequence, and cover the adapter cover.
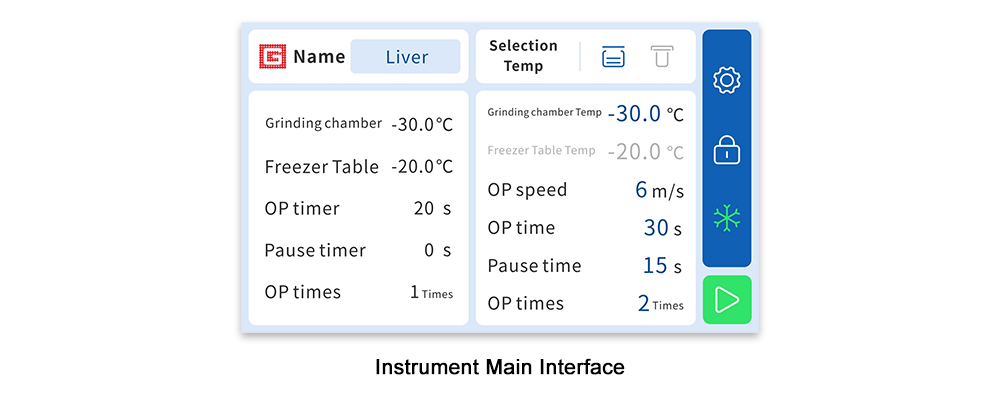
04. Set the operating speed, time, run times, click on temperature selection T to choose the temperature mode, and set the desired temperature for the grinding cabin or freezer.
05. Click ![]() start the grinding process. The instrument will automatically stop after the running timer resets to zero.
start the grinding process. The instrument will automatically stop after the running timer resets to zero.
2. Parameters Setting
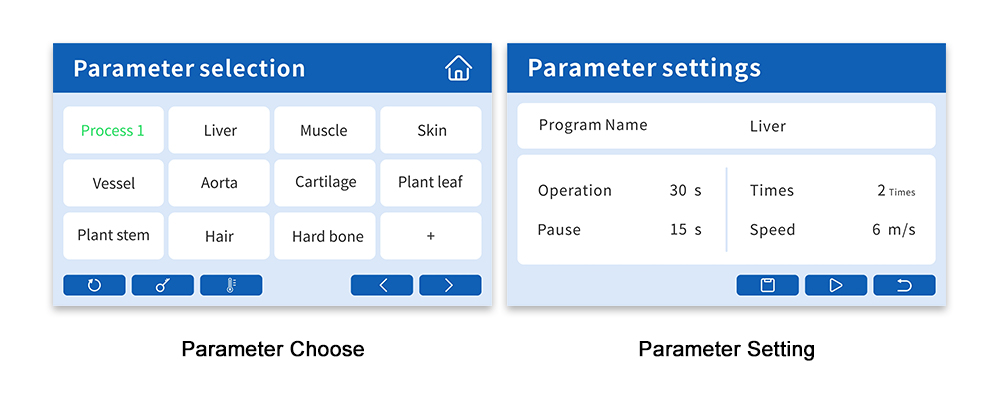
The instrument has preset one set of Program 1 parameters and 10 sets of common tissue grinding parameters, with a total of 24 sets of parameters, each of which can be edited. The parameters for Program 1 can be edited on the main interface and saved to the back end program.
If the sample needs to be ground for a longtime, the cycle numbers and pause time can be set:
The single cycle logic is: grinding time pause time (the number of cycles is set as 1 non-trigger pause time)
The total grinding time is: (single grinding time+pause time)*cycle number
Click the Grinding ON button to start the instrument. Touch screen starts countdown in light of the setting time, the grinding work stops automatically at the end of countdown. The adapter cannot be moved out till the grinding completely stopped; repeat the above operation if the grinding is not complete till the grinding requirements are met.
3. Password Setting
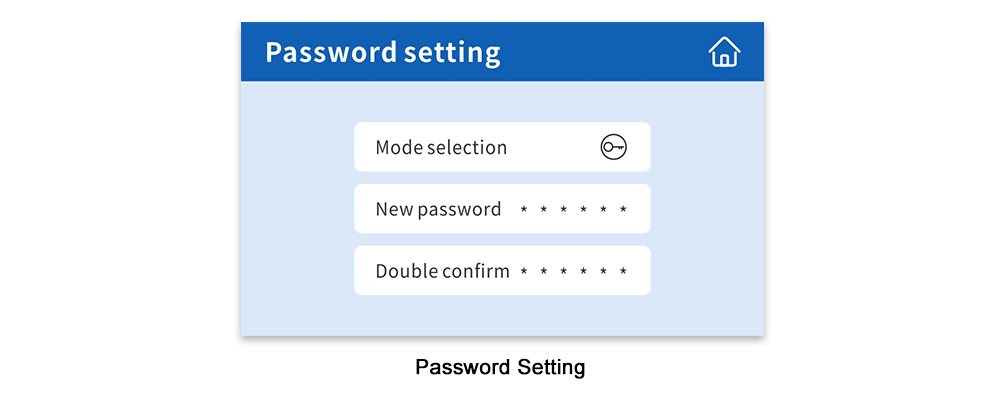
The instrument can set opening password.
When password mode is ![]() , need to enter 6 letters password to next step. (The starting password is 123456, and can change the password by yourself.)
, need to enter 6 letters password to next step. (The starting password is 123456, and can change the password by yourself.)
Parameters Setting and Grinding Beads Reference
Product Name | Grinding Beads | Grinding Time | Pause Time | Cycle Number | Speed |
Plant Leaf | 2mm*8 | 30s | 15s | 2 | 6m/s |
The heart, liver spleen, lung, kidney, and brain of rat & mouse | 2mm*8 | 30s | 10s | 1 | 6m/s |
The stomach, intestine, muscle, and fat of rat & mouse | 2mm*10 | 30s | 15s | 2 | 6m/s |
The skin, ears tail, and blood vessels of rat & mouse | 2mm*12 | 45s | 20s | 3 | 7m/s |
Cartilage, hair and hard bone of rat & mouse | 2mm*12 | 45s | 20s | 3 | 7m/s |
(These conditions are for reference only, and can be adjusted at anytime during the experiment based on the grinding effect.)
For RNA extraction, the grinding time should be appropriately extended compared to protein extraction. Add RNA extraction buffer during grinding. The specific grinding time depends on the amount and type of tissue being ground. Samples that are difficult to grind can be repeatedly ground 2-3 times, and the specific situation can be adjusted appropriately based on the experiment.
Grinding of Strong And Tough Tissues
For samples that are difficult to grind (such as soft bones, hair, etc.), a 2ml grinding tube can be used. The sample should be cut into small pieces of about 1-2mm, and then add an appropriate amount of grinding beads. After tightly closing the grinding tube, put it into liquid nitrogen and freeze for 2-3min. Do not add extraction solution and grind for 60 seconds at a speed of 7m/s. Then add extraction solution to the grinding tube and repeat the grinding process. If the grinding effect is not satisfactory, the sample can be frozen again and the above experimental steps can be repeated.
Notes
01. It is recommended to use our companys EP-200-Y centrifuge tube, which has thicker walls and higher material strength, suitable for grinding.
02. The tissue size is preferably below 1-3mm, and the weight should be within 100mg.
03. If you want to reuse the grinding beads, it is recommended to soak them in absolute ethanol for 15 minutes before use, then filter out the grinding beads and dry them for future use.
04. To prevent sample degradation while ensuring the grinding effect, the following principles should be followed:
·Minimize the number of grinding beads used ·Minimize the grinding time
·Turn on the compressor 15 minutes prior to the start of grinding to ensure a low temperature environment in the grinding room
05. When using the instrument, ensure that the load on both sides of the adapter is balanced, and do not use it unilaterally.
06. To protect the internal circuitry and mechanics of the instrument, do not rinse it with running water. Use a damp cloth to clean it.
07. If any abnormality occurs during use, immediately disconnect the power and contact a professional for handling.
08. The instrument must be placed on a horizontal and flat laboratory bench to prevent vibration during operation.
09. After ensuring that the adapter and fastening screws are correctly installed, close the top cover and start the instrument.
10. If the safety lock cannot be lifted, you can loosen the big knob left and right first, then normally lift the safety lock, loosen the big knob, and take out the sample.

")

